Main Body
Introduction
Chords form the basis of harmony in most music that we perform and listen to. Fundamentally, harmony is playing two or more pitches at the same time; an interval is a simple form of harmony. Usually, harmony is two or three voices singing melodies together, or one singer with a piano or guitar accompaniment. These can create different textures (patterns of multiple voices and/or instruments), but generically they make up harmony.
Since the concept of harmony is somewhat free-flowing–multiple voices (or one voice and an instrument) that may or may not sing at exactly the same time–how does a chord fit into this concept? A chord is a convenient way to take a collection of notes, for example, 3-4 notes, and put them into a group with one label name, like a C Major chord, or an Eb Dominant 7th chord, or a Dsus4 chord, etc. Depending on the texture, these groups of notes are more or less easy to see and hear. Look at this Bach Chorale hymn; here, the chord groupings are easy to see as a vertical stack of notes (blue boxes); each vertical group of notes constitutes a 3-note chord being sung by 4 voices (notice that one pitch is always doubled in each chord):
Chords as vertical grouping. Each vetical grouping notes, arranged by color, represents a chord, even though each horizontal line represents four different melody lines.
In this Debussy excerpt, from Première Arabesque, the notes of the chords are spread out–arpeggiated–but are still considered a chord.
Chords as arpeggiated grouping. In this excerpt, the chords are “spread out” horizontally, but can still be “grouped” into a chord structure.
Consider this orchestra score: https://youtu.be/lLxJcC8S4HU?t=309. This demonstrates the usefulness of chords when you realize that all of those instruments and notes can mostly be boiled down to 3 or 4-note chords. In fact, harmony in Western music is based mostly on triads: three-note chords.
There are 12 lines of music in this example; notice the heavy black vertical line on the left of the score–that groups all 12 staves together into a system. As the video progresses, note that they put two systems (of 12 staves each) per page. Again, the point here is that those 12 staves of notes can be distilled down to 3 and 4 note chords at any given point in the music.
Chord Structure and Position
Triads in Root Position
Triads are the most common type of chord used in our styles of music. We need to clarify two terms: Triad means a 3-note chord. Tertian refers to the interval used to build the chord–the 3rd. Don’t confuse the two separate uses of three.
Parts of a chord.

The basic triad is built using stacked 3rd intervals, and when they are stacked only in 3rds, this is called Root Position (other arrangements covered below). The named parts of the chord—Root, 3rd, 5th—are important to understand and remember. The 3rd of the chord is written a third higher than the root, and the 5th of the chord is written a fifth higher than the root; so, the two 3rds make up a 5th. [Why not a 6th, 3 + 3? Because, each 3rd shares the same middle note, so there’s an overlap–see the illustration on the right, above: D to F# = 3rd; F# to A = 3rd.]
Root Position Takeaway
One of the interesting things about chords is that they maintain their identity, even when they are broken apart and rearranged (remember the Debussy above). It does not matter how far the higher notes are from the lowest note, or how many of each note there are (doubles at different octaves or on different instruments, like in the orchestra score video example above); what matters is which note is lowest, as you can see below. ALL five examples of this G major chord are in root position, because G, the root, is the lowest sounding pitch; even when the other notes are rearranged in various ways above the Root, that does not affect the position label.
Look & Listen!
Concept Check
Example 6-1: Write a triad in root position using each root given; no accidentals are needed here:

First and Second Inversions
You may have wondered why it’s important to determine Root Position by which note is the lowest. Why not the highest? The reason, as with most practices in art and music, is partly history and partly physics.
A Little Science
The physics part is a bit beyond this class, but this video discusses the Harmonic Series, which is related to why the Bass is considered the fundamental voice within a chord. This video also recalls some ideas from the Bobby McFerrin video from Ch. 2.
The connection he makes between the harmonic series and the pentatonic scale has some validity, but is not the sole explanation for how the crowd sang the scale; there are cultural reasons as well. 1) many cultures share the pentatonic scale; 2) even the pentatonic scale is decided on by musical choices; 3) the harmonic series is a choice as well – strings, air columns, shaped pieces of metal (bells, vibraphones) all use this, but the inharmonic series could also be a choice. For example, traditional church bells are tuned slightly inharmonically (less simple mathematical ratios), as a choice, and harmonically tuned bells are an experimental choice.
It’s easy to understand how the melody line is the most important one in music; what’s less well-known is the importance of the Bass voice (we use the word “bass” generically a lot in music–it’s the lowest sounding instrument or voice). You may have an idea already about the importance of the bass player in a rock band and a jazz big band–that is somewhat dependent on the time period and style. Much of modern pop music uses electronic bass instead; however, the importance of the bass is still there. That is actually a very old concept in music history.
Composers and performers in much of western culture developed a particular style and texture that favored the highest and the lowest voices, which primarily has to do with the fact that they are easiest to hear when there are multiple voices. Additional voices filled out the harmony, but the Bass and the Soprano (again, these names are used generically for the lowest and highest voices or instruments) came to be considered the essential framework for the harmony. In the 17th century, the Bass voice became the primary structural voice, the foundation, for establishing the flow of the chord progression of a piece. This texture and technique was called Figured Bass (this notation was in use well into the 18th century). We won’t study figured bass in this course, but it’s good to know about if you study music further, especially if you are interested in more historic styles.
Once you’ve established which pitch is the Root, we can then begin to rearrange chords into different positions. If the third of the chord is the lowest note, the chord is in first inversion. If the fifth of the chord is the lowest note, the chord is in second inversion.
Chord Inversions
All three of the triads are C major (as C is the root in all three, marked red), but which note is in the bass voice determines the position: Root or an Inversion. With the 3rd of the chord in the bass, it is 1st inversion; 5th of the chord in the bass is 2nd inversion. 5-3, 6-3, and 6-4 are alternate names for inversion, based on something called Figured Bass (covered in Music 1A), an older system still used to a degree today, but mostly important for understanding/performing historical music scores. For this course, it gives a shorthand way of understanding the interval construction of chord positions when they are compressed as close as possible on one staff.
Here is another example with a G chord, showing more variations.
Key Takeaways
Inverting a chord–changing the bass position note–has several musical uses, which we will discuss later. It also creates a new “sound” or “effect” on the chord: inverted chords generally sound less “stable,” so it’s a nice variety (listen to the above examples).
It’s important to remember that a chord maintains its identity no matter how it is arranged: if the Root is C, that doesn’t change no matter where the root is placed in the voicing of the music. That holds true for the other parts of the chord as well–the 3rd and the 5th remain the same pitches that they were no matter where they show up. Also, doubling notes–having 2 or more copies in different octaves also does not change the identity of the chord. In summary:
- Remove any doubled notes.
- The Root is determined by arranging the notes so that they stack in 3rd intervals–this can only work one way (remove any doubled notes and compress notes close together).
- The Bass, lowest, note determines which position is being used–Root (Rt) or an Inversion (3rd or 5th of chord)
Finding root position.
In both cases, after getting rid of the doubled notes, the only way to rearrange the notes into stacked 3rds is to begin on G, whether you right them in the treble or bass clef.

Voicing is how the notes are arranged in the music. Root Position rearranges the notes in 3rd intervals to determine which note is the Root. Note that the double C pitch has been removed in the root position version.
Concept Check
Example 6-2: Rewrite each chord in root position and name the original position of the chord.

Naming Triad Qualities
As mentioned earlier, inverting a chord does affect its sound quality, but a much bigger difference in the chord’s sound comes from the quality of the intervals building the chord.
Chords are named according to the root and the interval qualities between the notes when the chord is in root position. Play these four different G chords.
Look & Listen!
These are all G chords, but they are four different types or qualities of G chords. The interval qualities between the notes are different, so the overall chord qualities sound very different.
Defining Major and Minor Chords
The most commonly used triads are major chords and minor chords.
- All major chords and minor chords have an interval of a perfect fifth between the root and the fifth of the chord.
A perfect fifth can be divided into a M3 plus a m3. If the interval between the root and the third of the chord is the M3 (the “bottom” 3rd), then the triad is a major chord. If the interval between the root and the third of the chord is the m3, then the triad is a minor chord. Both chords derive their name from the quality of the bottom 3rd. Listen closely to a major triad and a minor triad in the Triad Chord Qualities Noteflight file above.
Arrangement of the 5thd and 3rds in Major and Minor Triads. Both major and minor have P5 (red) from root to 5th. The 3rds have a swapped pattern: major has M3 on bottom – root to 3rd (purple) and a m3 on top – 3rd to 5th (green). The minor triad has the opposite 3rds pattern. The major triad is named by 3rd built on the root, M3 and m3, respectively.

In order to make identifying and building chords as simple as possible, we are going to use a modified interval approach. We are going to focus on just the 5ths and 3rds.
Examples
As with the intervals, we’re going to use the matched accidental principal (MAP) introduced in the Interval chapter. Remember that it’s very simple to memorize that all 5ths, when they have the same accidentals, or no accidentals, are perfect. The only exception is the b-f pair; it’s either Bb-F or B-F# to be perfect, otherwise, it is diminished. It’s even easy to visually recognize 5ths as always being a space-gap-space or line-gap-line.
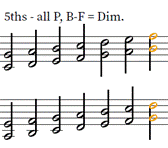
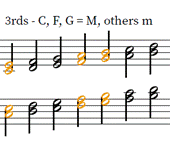
Next, it’s easy to memorize the 3rds that are built on C, F, G are major, and all the others are minor, as long as they have matched (or no) accidentals. Using your knowledge of intervals from the last chapter—and the simplified approach here—see how the 5ths and 3rds patterns consistently create major and minor triads. To “speed up” your recognition, it can be simpler to remove the accidentals, see what type of 5th or 3rd you have, and then add them back to see how they are modified. Again, the 5ths are the quickest to recognize when they have MAP, then all you need to look at is the bottom 3rd.
Additional examples of Major and Minor Triads. All 5ths are perfect; M3 and m3 from root determine the triad quality.
Concept Check
Example 6-3: Build major and minor triads: 1) Build a P5 above each root; 2) build a M3 above the first four; 3) build a m3 above the last three.

Defining Augmented and Diminished Chords
Because they don’t contain a P5, augmented and diminished chords have an unsettled feeling and are normally used sparingly. An augmented chord is built from two M3’s, which adds up to an augmented fifth, which is where it derives its name. A diminished chord is built from two m3’s, which add up to a diminished fifth, which is where it derives its name.
Using our MAP approach, most 5ths are going to be un-matched for augmented and diminished chords. Again, recognizing P5ths first can speed things up—remove the accidentals if it helps you—and then see how the un-matched accidental creates the Aug. (+) or Dim. (o)5th. Notice below that all 5ths are unmatched accidentals *except* the B-F pair on the B dim. chord, because the natural version of these two notes is already a diminished 5th.
Diminished and augmented examples. All diminished traids have a d5 (o5), all augmented triads have an A5 (+5).
Notice that sometimes you can’t avoid 1) double sharps or double flats; 2) mis-matched accidentals. If you use an enharmonic equivalent to avoid 1 or 2, you are changing the pitch class name, which change the spelling of the intervals and the entire chord. For example, here’s what would change if you did that in the above examples.
Changing the spelling of any note in a chord can significantly alter chord’s name and structure.
You can put the chord in a different position or add more of the same-named notes at other octaves without changing the name of the chord. But changing the note names or adding different-named notes will change the name of the chord.
Concept Check
Example 6-4: Build diminished and augmented triads: 1) Build an o5 above the root of the first four; 2) build an +5 above the root of the last three; 3) build a m3 above the root of the first four; 4) build a M3 above the root of the last three.

Pitch Class Chords Method
Becoming proficient with chords takes time and practice, but there is a way to make that practice more efficient. Musicians who use chords frequently have multiple ways of thinking about them, but that isn’t always practical for a general education student.
The best way to start is to stick with one method, which for this course is the pitch class method.
First, memorize the triad qualities of the pitches of the piano white keys only. Do this picturing them on the piano and on the staff, as below.

The qualities of the white key triads:
- All Major and Minor Triads have a P5 from Root to 5th
- The bottom third, which gives them their name, is the only difference.
- C, F, G are the only white-key Major triads (bottom 3rd is Major).
- The only diminished chord–on pitch B–has a diminished 5, which gives it its name; it also has a m3 on bottom.
Look & Listen!
Second, using the MAP technique, learn to convert any white-key Triad to a chromatic version (and vice versa). This works because if you alter all the notes of a triad in the same way, then the relative intervals have not changed, so the quality has not changed.
Look & Listen! Chromatic altering of a complete triad. Each example maintains the same quality.
Third, memorize the four common ways to alter a Triad quality as follows.
Look & Listen!
Application
These are only examples; the method works on every root position triad. Once you have established the first quality–on any pitch–then you can create the second quality (and vice versa).
- Major to minor by lowering the 3rd; minor to major by raising the 3rd.
- Major to augmented by raising the 5th; augmented to major by lowering the 5th.
- Minor to diminished by lowering the 5th; diminished to minor by raising the 5th.
- Diminished to major by lowering the root; major to diminished by raising the root.
Remember that raising and lowering are relative to the context of the key signature or any accidentals, but these always hold true:
- flat raises to natural; natural lowers to flat
- natural raises to sharp; sharp lowers to natural
- more advanced:
- sharp raises to double sharp; double sharp lowers to single sharp
- flat lowers to double flat; double flat raises to single flat
To find any triad starting on an accidental, take the closet white-key chord and convert it chromatically. If it is the same quality, then you’re done; if it is a different quality, then use the quality conversion method to create the right quality as needed (major to minor or vice versa, minor to diminished, etc).
You will only need the chromatic conversion technique for the 5 black keys of the piano. And any triad on Bb can just use the Bo chord and convert from thereby sliding the root down a ½ step. After practice, you’ll realize you can start to manipulate any chord in a variety of ways, as you get more familiar with certain chords that are used repeatedly.
Concept Check
Example 6-5: Identify the Root, Quality, and Inversion of these triads that are not necessarily in root position. Rewrite them in root position first: stack up in 3rds by letter names (only write each pitch once for those that are doubled).

Dominant Seventh Chords
If you take a basic triad and add a fourth note on top that is a seventh above the root, you have a seventh chord. There are several different types of seventh chords, distinguished by both the type of triad and the type of seventh interval used. We will only be looking at one type in this course, the Dominant 7th chord.
The Dominant 7th chord is made up of a Major triad and a m7 interval above the root. It is called the dominant 7th because it is constructed on the fifth (dominant) scale degree of a key.
Step 1 is to build a major triad. Step 2, create a minor 7th interval above the root of the major triad. Therefore, using our MAP interval approach, let’s look at just the 7th pitch class intervals to find a quick way to memorize 7th intervals.
7th Intervals Chart
The 7ths built on C and F are major 7ths, all others are minor. Using MAP and alterations, you can quickly adjust to make the 7th minor above the root of the Major triad.
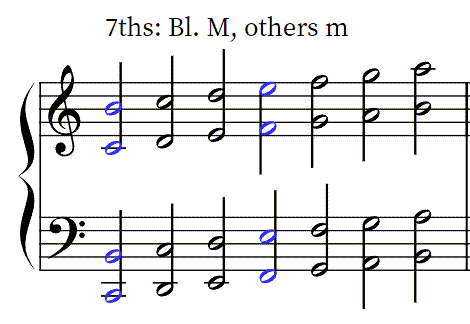
Look & Listen!
Listen to the difference between v7 (natural minor) and V7 (harmonic minor). It became a tradition starting in the 17th century to most often use the harmonic version. That is still the case mostly today, but pop and jazz music more regularly make use of natural minor v and v7. Notice how the V7 version leads into the tonic chord more strongly.
Concept Check
Example 6-6: Create Dominant 7th chords on the following roots. 1) Build a major triad; 2) build a m7th interval above the root. In steps 1 and 2, do not change the given root pitch.

Chord Labels, Inversions, and Leadsheet Symbols
So far, we’ve only labeled the chords by naming the root and listing the quality. Musicians need a less cumbersome method of labeling chords. This is practical for composers, arrangers, and performers (especially people using a lot of chords, like pianists and guitarists), who need to be able to talk to each other about the chords that they are reading, writing, and playing.
Chord manuals, fingering charts, chord diagrams, and notes written out on a staff are all very useful, especially if the composer wants a very particular sound (called a “voicing”) on a chord. In many cases, though, all you really need to know are the name of the chord, your major scales and minor scales, a few rules, and you can figure out the notes in any chord. If you know all your scales (always a good thing to know, for so many reasons), you can find all the intervals from the root using scales. If you plan to take the Jazz Theory course, being proficient at these skills will be extremely helpful.
Chord Symbols and Leadsheets
Some instrumentalists, such as guitarists and pianists, are often expected to be able to play a named chord, or an accompaniment based on that chord, without seeing the notes written out in staff notation. In such cases, a chord symbol above the staff tells the performer what chord should be used as an accompaniment to the melody until the next symbol appears. This is called “lead sheet” (also “leadsheet”) notation. It’s used in conjunction with “fake books” and “charts,” which have to do with a player showing up to a gig, and being able to play along (“fake it”) with other musicians on “sight”. The idea is that you are given the “lead” part—the melody—and then the player comes up with their own accompaniment (depending on the instrument), based on the chord symbols, to go along with the melody, as below.
Chord Leadsheet Symbols
Excerpt from the song “Popular,” from the musical Wicked.
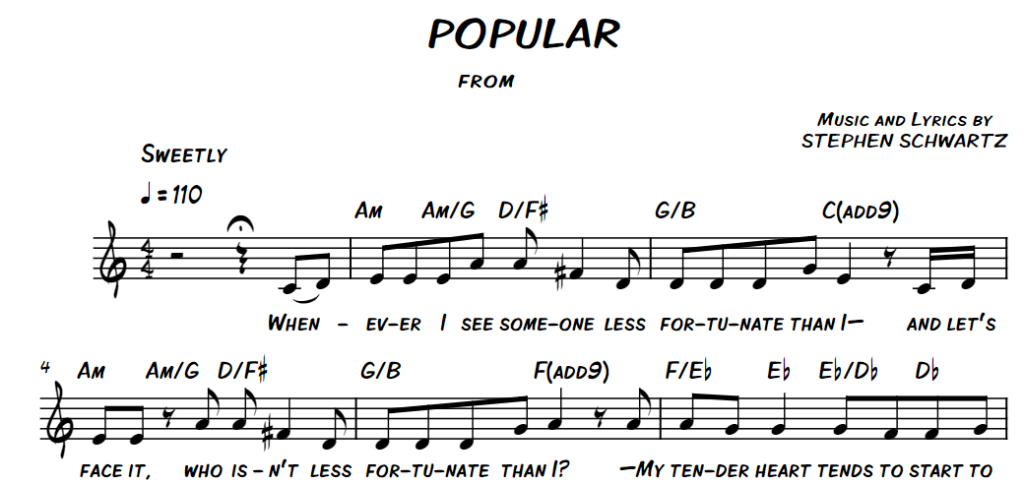
From the sample page @ https://www.musicnotes.com/ – one of many sites that sell leadsheet music scores.
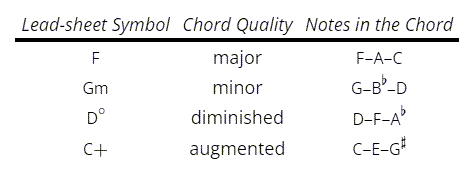
Here are the basic chord symbols used for leadsheet, below. The example above has a couple chords that we won’t even deal with in this course, such “add9” but you can imagine how they would work: we just learned about putting a 7th above the root, so an “add 9” would put a 9th above the root – a compound interval (Ch. 5).
Summary chart of the basic leadsheet symbols for triads.
From Robert Hutchinson’s OER text (used in Music 1A): https://musictheory.pugetsound.edu/
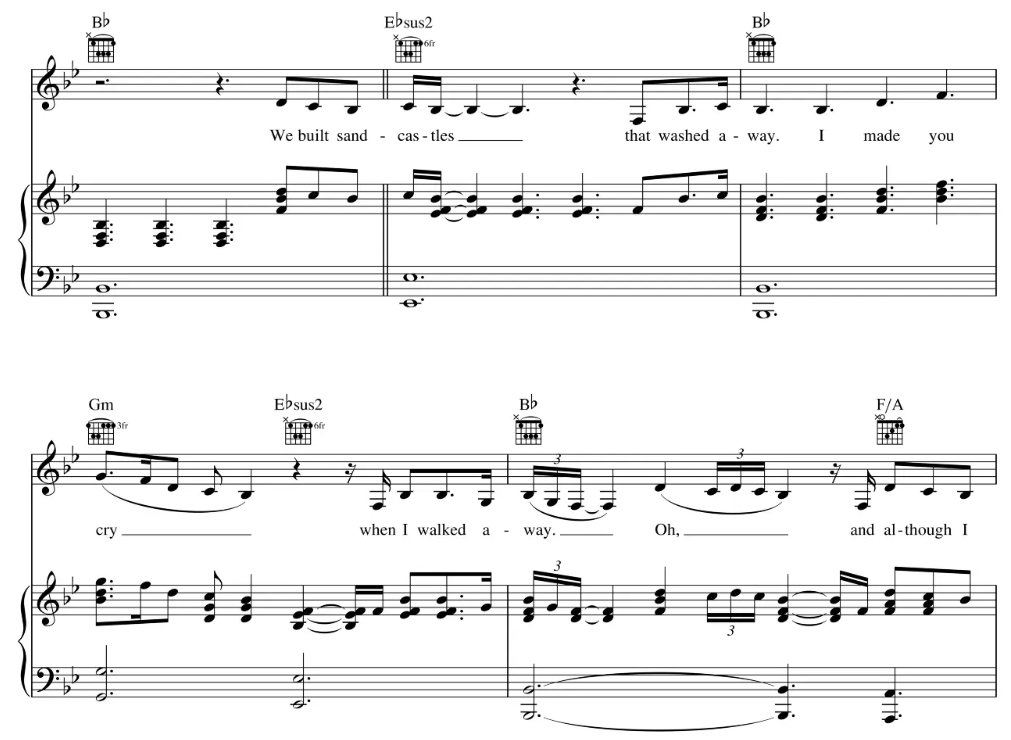
Another example of leadsheet, from Beyonce’s “Sandcastles,” which also includes the guitar fretboard symbol and a notated piano accompaniment. The fretboard symbols are just a basic guide for a beginning guitarist; the guitarist would need to improvise or imitate the original. The pianist could read the given version, improvise their own, based on the leadsheet, or do a combination of both.
From sample page @ musicnotes.com
In popular music, it’s relatively straightforward how leadsheet symbols are used, as covered in the video below. Some of the symbols, like in the examples above, above would need some more study, but it’s easy to find many guides for these online. Once you know the basics from a course like this, transferring and expanding your chord knowledge just takes some regular practice.
In jazz music, the chord system is quite a bit more extensive and fairly complicated, and beyond this course. In addition, which symbols are used has changed slightly over time. In reality, the best way to understand jazz chord theory and symbols is to take a jazz theory course (Music 29) as well as play with other jazz musicians (Music 57AD—Jazz Combos and Music 23AD—Jazz Choir). Within historical music theory, Roman Numeral symbols are also used (Ch. 7 and Music 1A).
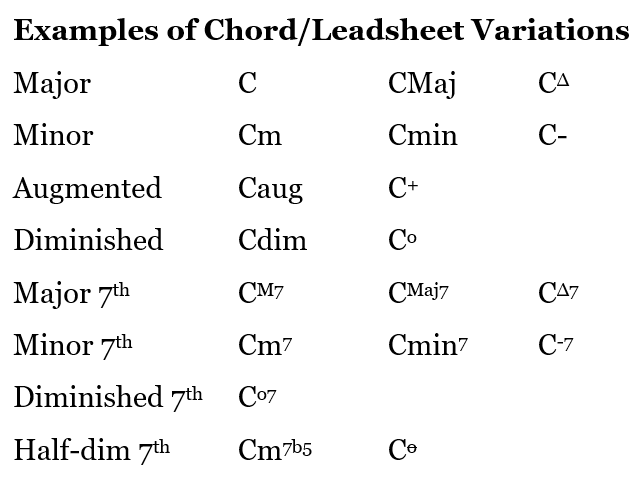
This figure is just for illustration but gives a brief sense of how chord symbols can get more complicated in more advanced music. If your goal is mostly focused on songbooks, then you won’t need to worry about most of these – the simple symbols discussed above will suffice.
Additional leadsheet symbols. Most of these are beyond use in this course, and are shown only for illustration.
Leadsheet Symbols and Inversions
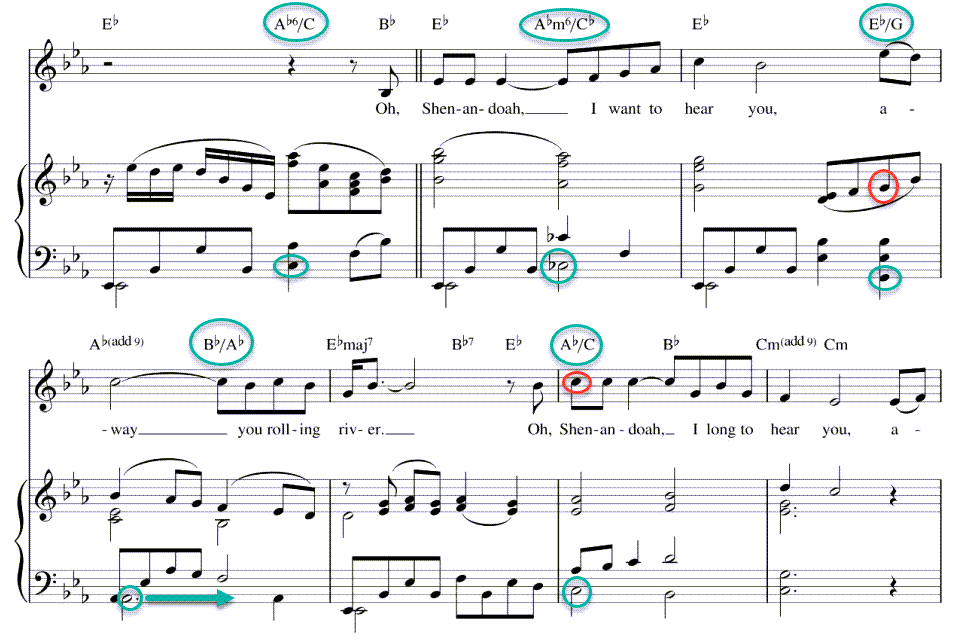
Leadsheet music scores communicate inversions with a slash (/) and another pitch letter to state which pitch should be in the bass. For example, the following examples show leadsheet above the staff, where it is typically written. The pitch beneath the slash is the pitch in the bass–the lowest-sounding pitch.
Leadsheet symbols with inversions.

Various leadsheet symbols in context.
A final example shows a typical songbook leadsheet with a variety of chord types, including several inversions, circled in green. The bass note, which creates the inversion, is also circled in green. Note for the Eb/G and the last Ab/C chords, the inversion is, again, caused by the bass note – not the higher octave of the same pitch circled in red.
From virtualsheetmusic.com sample page, Shenandoah, Cohen & Smith.
Voicing and Texture
How the notes of a chord move from one chord to another chord is called voiceleading. How you place notes inside a given chord is the voicing. This is closely related to the texture of the music: the three notes of one chord voiced on a guitar, versus a piano, versus a choir, versus an orchestra will create very different textures. For this class, we will look at only two textures: chorale (SATB, Soprano, Alto, Tenor, Bass – voices of a typical choir) and Keyboard. For voiceleading, we will only look at keyboard voiceleading.
Continuing on with more music?
SATB texture is presented in this course only for illustration and contrast with keyboard texture, which is much easier to learn the basics for. If you want to study voiceleading in more detail, then Music 1A is the course to take next. The principles of these essential textures can be applied to a number of other types of textures and styles.
Keyboard Texture and Voiceleading
Here, the chords have been voiced in all root position, which means each chord “jumps” to the next, with the root always on the bottom and the 3rd and 5th only stacked above—somewhat interesting, but not very sophisticated sounding.
Look & Listen
Keyboard texture actually needs two components:
- Put the complete chord in the treble clef, as shown above—this lets the keyboard player “voice” the chord with only their right hand.
- Combine this with a bass “line” in the bass clef (creating a grand staff), which the keyboardist plays with their left hand—this “thickens” the texture for a fuller sound. This also allows for a more complete use of inversion.
Here is a complete keyboard texture:
Look & Listen
Some key points:
- Version A: the bass clef has all of the roots, shown in red. The Treble clef is the same as the previous example. This still sounds very “blocky,” and adding the bass voice thickens the texture, but doesn’t add more varied movement.
- Version B: the treble clef now shows how the three lines of pitches move more smoothly; they move as little as possible as the notes of one chord move to the next. This is done by:
- a) keeping common tones shared between chords;
- b) moving other notes to the next closest note. The roots are still shown in red, but it is not always the bottom note.
- The Bass clef still shows the roots, so the overall texture is still in root position. REMEMBER: inversion is not determined by the bottom note of the treble clef chord, it is determined by the BASS clef note.
- Version C: the bass line has been modified with inversions, shown by the leadsheet and the bass clef notes in black; red still show roots. This is the most interesting texture as the bass line creates another interesting line itself, but also the inversions affect the overall sound.
Keyboard texture provides an easy way for someone to accompany a singer (or instrumental soloist) by creating a simple, yet clear, background texture of the harmony. By voicing the chords mostly in the right hand (treble clef), the complete harmony is easy to play with one hand. By adding the bass line in the bass clef, the acoustics of the lower note create a richer texture and also allow for a clear inversion voice to create a more interesting texture.
What we are covering here is the simplest version of keyboard texture, but is still quite useful. Building on this would be typical songbooks you can find for popular music of all kinds. If you were interested in learning more about it, you could take Music 51A, our beginning piano course.
Chorale SATB Texture
In contrast with keyboard texture, SATB texture has a more complex set of “rules” for the voicing and voiceleading work. As mentioned before, these go beyond this course (see Music 1A to continue), but I want to just introduce it to help illustrate the concept of how texture can be expressed in many different ways.
As noted earlier, SATB stands for Soprano, Alto, Tenor, and Bass, which are the standard voice ranges for a choir, from highest to lowest. Traditionally, these encompass the female (soprano, high; alto, low) and male (tenor, high; bass, low) ranges. These are not hard categories, as some females can sing low enough to cover the tenor range, and some males learn to expand their range into soprano range (countertenors).
History note!
Funnily enough, alto in the original Latin and Italian meant “high,” since it used to be the highest voice range; later, the soprano, which means “above,” became known as the highest, so now alto is considered the “lower” voice range for women.
There is a long and somewhat complicated history to voice ranges, crossover gender roles (comic operas), and even castration to preserve high ranges in males (not-so-comic operas), but we don’t have the time here.
This texture was historically known as chorale texture, referring to the old hymn texture made well-known by J.S. Bach. See here for an example:
While the only place these are still used is in religious settings, the practical use in theory courses is that we can efficiently teach the principles of multiple voice textures in a compact form. For instance, this Haydn symphony score…
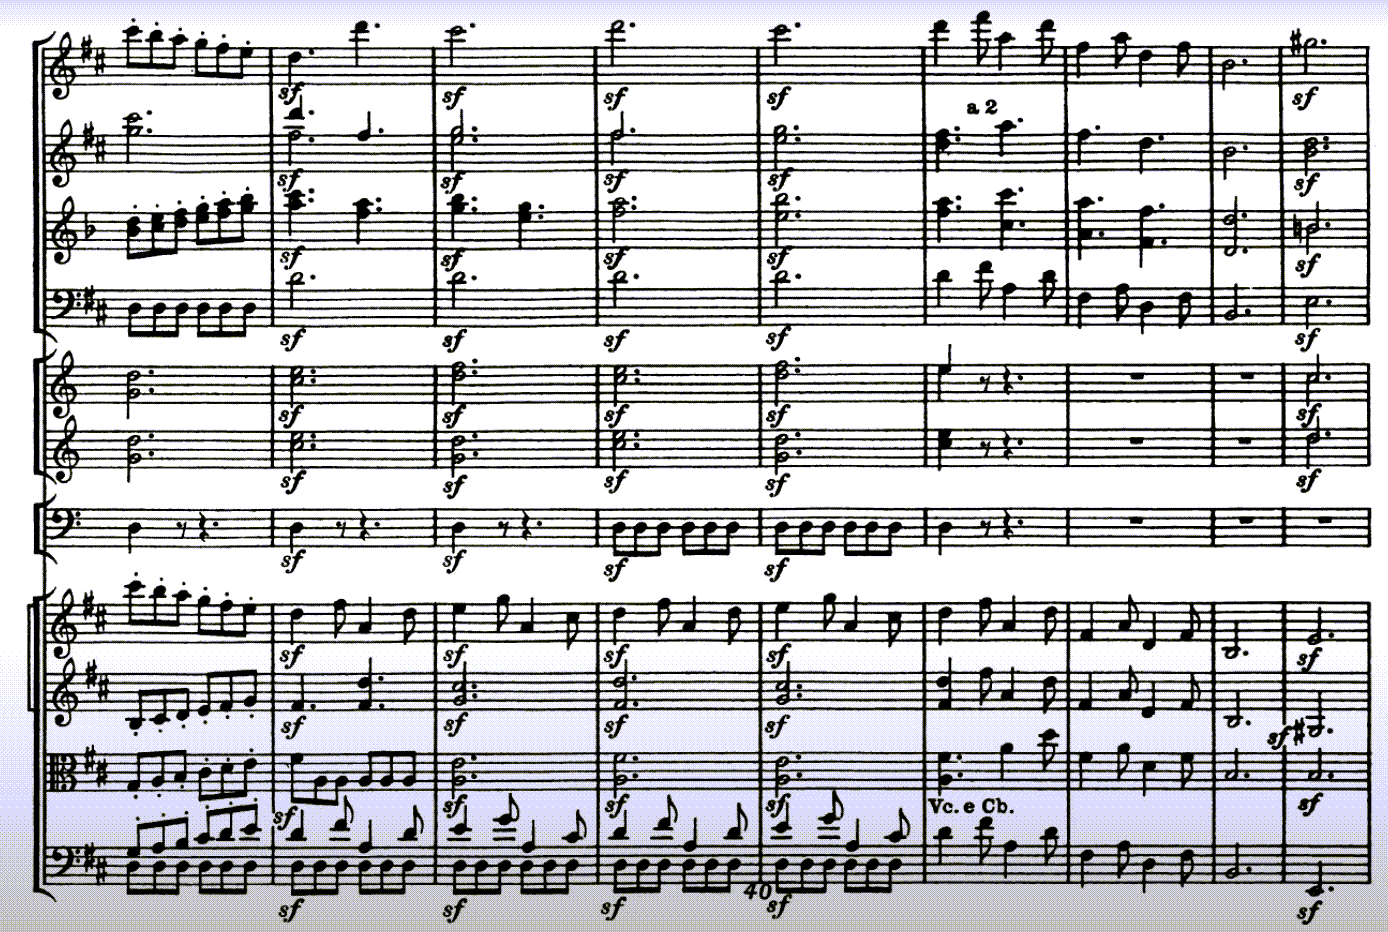
…can be essentially reduced to…
Look & Listen!
This is a very basic reduction of Haydn’s score, just showing some of the basic notes that are making up certain chords, eliminating most of the doubled pitches. Compare to his version:
The essential idea behind SATB voiceleading is a way to help students grasp the underlying structure of more complicated pieces in a simpler format. If you continue in music theory (Music 1A and others), you’ll learn these concepts.

